#linux add user to group sudo
Explore tagged Tumblr posts
Visit Tumblr Blog
Explore Tumblr blogs with no restrictions, modern design and the best experience.
Last Seen Tumblr Blogs


Fun Fact
BuzzFeed published a report claiming that Tumblr was utilized as a distribution channel for Russian agents to influence American voting habits during the 2016 presidential election in Feb 2018.
Text

SYSTEM ADMIN INTERVIEW QUESTIONS 24-25
Table of Content
Introduction
File Permissions
User and Group Management:
Cron Jobs
System Performance Monitoring
Package Management (Red Hat)
Conclusion
Introduction
The IT field is vast, and Linux is an important player, especially in cloud computing. This blog is written under the guidance of industry experts to help all tech and non-tech background individuals secure interviews for roles in the IT domain related to Red Hat Linux.
File Permissions
Briefly explain how Linux file permissions work, and how you would change the permissions of a file using chmod. In Linux, each file and directory has three types of permissions: read (r), write (w), and execute (x) for three categories of users: owner, group, and others. Example: You will use chmod 744 filename, where the digits represent the permission in octal (7 = rwx, 4 = r–, etc.) to give full permission to the owner and read-only permission to groups and others.
What is the purpose of the umask command? How is it helpful to control default file permissions?umask sets the default permissions for newly created files and directories by subtracting from the full permissions (777 for directories and 666 for files). Example: If you set the umask to 022, new files will have permissions of 644 (rw-r–r–), and directories will have 755 (rwxr-xr-x).
User and Group Management:
Name the command that adds a new user in Linux and the command responsible for adding a user to a group. The Linux useradd command creates a new user, while the usermod command adds a user to a specific group. Example: Create a user called Jenny by sudo useradd jenny and add him to the developer’s group by sudo usermod—aG developers jenny, where the—aG option adds users to more groups without removing them from other groups.
How do you view the groups that a user belongs to in Linux?
The group command in Linux helps to identify the group a user belongs to and is followed by the username. Example: To check user John’s group: groups john
Cron Jobs
What do you mean by cron jobs, and how is it scheduled to run a script every day at 2 AM?
A cron job is defined in a crontab file. Cron is a Linux utility to schedule tasks to run automatically at specified times. Example: To schedule a script ( /home/user/backup.sh ) to run daily at 2 AM: 0 2 * * * /home/user/backup.sh Where 0 means the minimum hour is 2, every day, every month, every day of the week.
How would you prevent cron job emails from being sent every time the job runs?
By default, cron sends an email with the output of the job. You can prevent this by redirecting the output to /dev/null. Example: To run a script daily at 2 AM and discard its output: 0 2 * * * /home/user/backup.sh > /dev/null 2>&1
System Performance Monitoring
How can you monitor system performance in Linux? Name some tools with their uses.
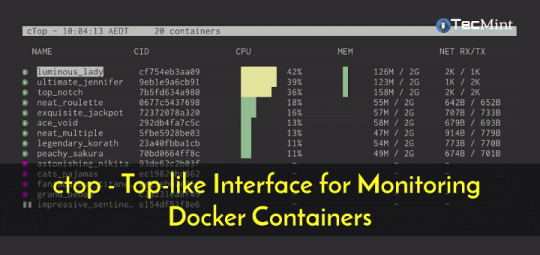
Some of the tools to monitor the performance are: Top: Live view of system processes and usage of resource htop: More user-friendly when compared to the top with an interactive interface. vmstat: Displays information about processes, memory, paging, block IO, and CPU usage. iostat: Showcases Central Processing Unit (CPU) and I/O statistics for devices and partitions. Example: You can use the top command ( top ) to identify processes consuming too much CPU or memory.
In Linux, how would you check the usage of disk space?
The df command checks disk space usage, and Du is responsible for checking the size of the directory/file. Example: To check overall disk space usage: df -h The -h option depicts the size in a human-readable format like GB, MB, etc.
Package Management (Red Hat)
How do you install, update, or remove packages in Red Hat-based Linux distributions by yum command?
In Red Hat and CentOS systems, the yum package manager is used to install, update, or remove software. Install a package: sudo yum install httpd This installs the Apache web server. Update a package: sudo yum update httpd Remove a package:sudo yum remove httpd
By which command will you check the installation of a package on a Red Hat system?
The yum list installed command is required to check whether the package is installed. Example: To check if httpd (Apache) is installed: yum list installed httpd
Conclusion
The questions are designed by our experienced corporate faculty which will help you to prepare well for various positions that require Linux such as System Admin.
Contact for Course Details – 8447712333
2 notes
·
View notes
Text
"The Right Way to Add Users to Sudoers Without Compromising Security"
Granting administrative privileges in Linux isn’t just about functionality — it’s a matter of trust and security. The sudoers system is a powerful way to control access, but misusing it can lead to serious vulnerabilities.
This blog breaks down the correct, secure, and thoughtful way to add users to the sudoers system without exposing your Linux environment to risk — all without diving into terminal commands.
🧠 Why the Sudoers System Exists
In Linux, the root user has full control over the system. However, it’s unsafe to use this account directly or share access to it. That’s where sudo comes in — it acts like a controlled gate, letting approved users carry out admin tasks while tracking and limiting their power.
The sudoers system defines who can use sudo, and what actions they are allowed to perform.
🎯 The Real Goal: Controlled Administrative Access
When adding users to sudoers, the goal is not just to “make it work” — it’s to do so responsibly, following these core principles:
🔐 1. Minimum Required Access
Don’t grant full administrative rights unless it’s absolutely necessary. Most users only need limited privileges to perform specific tasks.
Example: A developer might only need permission to restart a web server — not to install software or edit system files.
🧩 2. Specific, Not Broad Permissions
Avoid giving overly broad permissions. It’s better to allow access to only the tools or actions a user truly needs, rather than giving full access across the system.
Why this matters: Over-permissioned users could unintentionally (or maliciously) change critical system settings.
📁 3. Organized and Trackable Access
Structure your access rules so they are clear and easy to review. Keep user permissions separated and well-documented. This helps during audits, troubleshooting, or team changes.
👥 4. Use Roles or Groups Wisely
If multiple users need the same level of access, consider organizing them into a group. That way, you can manage their privileges collectively, without having to repeat rules for each person.
🧪 5. Test and Monitor Privileges Regularly
Granting sudo access isn’t a one-time task. Regularly review who has access and ensure that all privileges are still necessary. Also, monitor system logs to track how sudo privileges are being used.
🚫 Common Mistakes to Avoid
Even experienced admins can introduce risk if they’re not careful. Here are some things not to do: ❌ Mistake⚠️ Risk IntroducedGiving full system access to casual usersIncreases chance of critical errorsAllowing unrestricted access to sensitive toolsUsers might bypass intended security controlsSkipping access reviewsOutdated permissions can lead to long-term vulnerabilitiesNot recording who has what permissionsMakes audits and incident response harder
✅ Best Practices Summary
Here’s a recap of how to add users to sudoers safely and correctly:
Only give access that’s needed for the user’s role
Be precise about what actions users can perform
Avoid full administrative access unless absolutely necessary
Keep access policies clean, structured, and documented
Regularly audit and review who has sudo access
🏁 Final Thoughts
Adding a user to the sudoers system isn't just about function — it's a security decision that should be made with care. By following a structured, minimal-access approach, you can keep your Linux system both productive and protected.
In short:
✅ Give access thoughtfully ✅ Review regularly ✅ Grant only what's required
1 note
·
View note
Text
Postal SMTP install and setup on a virtual server

Postal is a full suite for mail delivery with robust features suited for running a bulk email sending SMTP server. Postal is open source and free. Some of its features are: - UI for maintaining different aspects of your mail server - Runs on containers, hence allows for up and down horizontal scaling - Email security features such as spam and antivirus - IP pools to help you maintain a good sending reputation by sending via multiple IPs - Multitenant support - multiple users, domains and organizations - Monitoring queue for outgoing and incoming mail - Built in DNS setup and monitoring to ensure mail domains are set up correctly List of full postal features
Possible cloud providers to use with Postal
You can use Postal with any VPS or Linux server providers of your choice, however here are some we recommend: Vultr Cloud (Get free $300 credit) - In case your SMTP port is blocked, you can contact Vultr support, and they will open it for you after providing a personal identification method. DigitalOcean (Get free $200 Credit) - You will also need to contact DigitalOcean support for SMTP port to be open for you. Hetzner ( Get free €20) - SMTP port is open for most accounts, if yours isn't, contact the Hetzner support and request for it to be unblocked for you Contabo (Cheapest VPS) - Contabo doesn't block SMTP ports. In case you are unable to send mail, contact support. Interserver
Postal Minimum requirements
- At least 4GB of RAM - At least 2 CPU cores - At least 25GB disk space - You can use docker or any Container runtime app. Ensure Docker Compose plugin is also installed. - Port 25 outbound should be open (A lot of cloud providers block it)
Postal Installation
Should be installed on its own server, meaning, no other items should be running on the server. A fresh server install is recommended. Broad overview of the installation procedure - Install Docker and the other needed apps - Configuration of postal and add DNS entries - Start Postal - Make your first user - Login to the web interface to create virtual mail servers Step by step install Postal Step 1 : Install docker and additional system utilities In this guide, I will use Debian 12 . Feel free to follow along with Ubuntu. The OS to be used does not matter, provided you can install docker or any docker alternative for running container images. Commands for installing Docker on Debian 12 (Read the comments to understand what each command does): #Uninstall any previously installed conflicting software . If you have none of them installed it's ok for pkg in docker.io docker-doc docker-compose podman-docker containerd runc; do sudo apt-get remove $pkg; done #Add Docker's official GPG key: sudo apt-get update sudo apt-get install ca-certificates curl -y sudo install -m 0755 -d /etc/apt/keyrings sudo curl -fsSL https://download.docker.com/linux/debian/gpg -o /etc/apt/keyrings/docker.asc sudo chmod a+r /etc/apt/keyrings/docker.asc #Add the Docker repository to Apt sources: echo "deb https://download.docker.com/linux/debian $(. /etc/os-release && echo "$VERSION_CODENAME") stable" | sudo tee /etc/apt/sources.list.d/docker.list > /dev/null sudo apt-get update #Install the docker packages sudo apt-get install docker-ce docker-ce-cli containerd.io docker-buildx-plugin docker-compose-plugin -y #You can verify that the installation is successful by running the hello-world image sudo docker run hello-world Add the current user to the docker group so that you don't have to use sudo when not logged in as the root user. ##Add your current user to the docker group. sudo usermod -aG docker $USER #Reboot the server sudo reboot Finally test if you can run docker without sudo ##Test that you don't need sudo to run docker docker run hello-world Step 2 : Get the postal installation helper repository The Postal installation helper has all the docker compose files and the important bootstrapping tools needed for generating configuration files. Install various needed tools #Install additional system utlities apt install git vim htop curl jq -y Then clone the helper repository. sudo git clone https://github.com/postalserver/install /opt/postal/install sudo ln -s /opt/postal/install/bin/postal /usr/bin/postal Step 3 : Install MariaDB database Here is a sample MariaDB container from the postal docs. But you can use the docker compose file below it. docker run -d --name postal-mariadb -p 127.0.0.1:3306:3306 --restart always -e MARIADB_DATABASE=postal -e MARIADB_ROOT_PASSWORD=postal mariadb Here is a tested mariadb compose file to run a secure MariaDB 11.4 container. You can change the version to any image you prefer. vi docker-compose.yaml services: mariadb: image: mariadb:11.4 container_name: postal-mariadb restart: unless-stopped environment: MYSQL_ROOT_PASSWORD: ${DB_ROOT_PASSWORD} volumes: - mariadb_data:/var/lib/mysql network_mode: host # Set to use the host's network mode security_opt: - no-new-privileges:true read_only: true tmpfs: - /tmp - /run/mysqld healthcheck: test: interval: 30s timeout: 10s retries: 5 volumes: mariadb_data: You need to create an environment file with the Database password . To simplify things, postal will use the root user to access the Database.env file example is below. Place it in the same location as the compose file. DB_ROOT_PASSWORD=ExtremelyStrongPasswordHere Run docker compose up -d and ensure the database is healthy. Step 4 : Bootstrap the domain for your Postal web interface & Database configs First add DNS records for your postal domain. The most significant records at this stage are the A and/or AAAA records. This is the domain where you'll be accessing the postal UI and for simplicity will also act as the SMTP server. If using Cloudflare, turn off the Cloudflare proxy. sudo postal bootstrap postal.yourdomain.com The above will generate three files in /opt/postal/config. - postal.yml is the main postal configuration file - signing.key is the private key used to sign various things in Postal - Caddyfile is the configuration for the Caddy web server Open /opt/postal/config/postal.yml and add all the values for DB and other settings. Go through the file and see what else you can edit. At the very least, enter the correct DB details for postal message_db and main_db. Step 5 : Initialize the Postal database and create an admin user postal initialize postal make-user If everything goes well with postal initialize, then celebrate. This is the part where you may face some issues due to DB connection failures. Step 6 : Start running postal # run postal postal start #checking postal status postal status # If you make any config changes in future you can restart postal like so # postal restart Step 7 : Proxy for web traffic To handle web traffic and ensure TLS termination you can use any proxy server of your choice, nginx, traefik , caddy etc. Based on Postal documentation, the following will start up caddy. You can use the compose file below it. Caddy is easy to use and does a lot for you out of the box. Ensure your A records are pointing to your server before running Caddy. docker run -d --name postal-caddy --restart always --network host -v /opt/postal/config/Caddyfile:/etc/caddy/Caddyfile -v /opt/postal/caddy-data:/data caddy Here is a compose file you can use instead of the above docker run command. Name it something like caddy-compose.yaml services: postal-caddy: image: caddy container_name: postal-caddy restart: always network_mode: host volumes: - /opt/postal/config/Caddyfile:/etc/caddy/Caddyfile - /opt/postal/caddy-data:/data You can run it by doing docker compose -f caddy-compose.yaml up -d Now it's time to go to the browser and login. Use the domain, bootstrapped earlier. Add an organization, create server and add a domain. This is done via the UI and it is very straight forward. For every domain you add, ensure to add the DNS records you are provided.
Enable IP Pools
One of the reasons why Postal is great for bulk email sending, is because it allows for sending emails using multiple IPs in a round-robin fashion. Pre-requisites - Ensure the IPs you want to add as part of the pool, are already added to your VPS/server. Every cloud provider has a documentation for adding additional IPs, make sure you follow their guide to add all the IPs to the network. When you run ip a , you should see the IP addresses you intend to use in the pool. Enabling IP pools in the Postal config First step is to enable IP pools settings in the postal configuration, then restart postal. Add the following configuration in the postal.yaml (/opt/postal/config/postal.yml) file to enable pools. If the section postal: , exists, then just add use_ip_pools: true under it. postal: use_ip_pools: true Then restart postal. postal stop && postal start The next step is to go to the postal interface on your browser. A new IP pools link is now visible at the top right corner of your postal dashboard. You can use the IP pools link to add a pool, then assign IP addresses in the pools. A pool could be something like marketing, transactions, billing, general etc. Once the pools are created and IPs assigned to them, you can attach a pool to an organization. This organization can now use the provided IP addresses to send emails. Open up an organization and assign a pool to it. Organizations → choose IPs → choose pools . You can then assign the IP pool to servers from the server's Settings page. You can also use the IP pool to configure IP rules for the organization or server. At any point, if you are lost, look at the Postal documentation. Read the full article
0 notes
Text
Simply about Linux Security
Linux is often praised as one of the best operating systems in terms of security due to several key factors that make it inherently secure and resilient against many types of attacks. Here's why:
1. Open-Source Nature
Transparency: Linux is open-source, meaning its source code is publicly available for review. This transparency allows anyone (including security experts) to examine the code for vulnerabilities, report bugs, and contribute fixes. This collaborative approach leads to faster identification and patching of security issues compared to proprietary systems.
Community and Auditing: Since many users and organizations contribute to Linux's development, any vulnerabilities discovered are often addressed quickly.
2. User Privileges and Access Control
Least Privilege Principle: In Linux, by default, users do not have administrative (root) access to the system. Administrative rights are required to make significant system changes, reducing the risk of malware or attackers exploiting a compromised user account to take control of the system.
Sudo Command: Administrative tasks are typically carried out using sudo (superuser do), which provides controlled, time-limited access to root privileges. This limits potential damage by preventing unnecessary exposure of administrative rights.
3. Strong File Permissions and Ownership
Linux enforces strict file permissions for users and groups, ensuring that only authorized users can access, modify, or execute files. This is a fundamental aspect of Linux's security model, making it difficult for unauthorized users or malware to alter important system files.
Each file has an owner, a group, and a set of permissions (read, write, execute), allowing for detailed control over who can do what with each file.
4. Security Modules and Features
SELinux (Security-Enhanced Linux): This is a set of kernel-level security enhancements that implement mandatory access control (MAC). It adds an additional layer of security by enforcing strict access policies that restrict how processes interact with the system and each other.
AppArmor: Similar to SELinux, AppArmor is a security module that restricts programs to a set of predefined security profiles, preventing them from performing unauthorized actions.
Chroot and Namespaces: These tools allow isolation of processes, limiting the damage they can do even if compromised.
5. Frequent Security Patches
The Linux community is very active in identifying and fixing vulnerabilities. Most Linux distributions offer regular updates, including security patches, making it quick and easy to keep the system secure.
Security advisories and patches for distributions (like Debian, Ubuntu, or Red Hat) are generally well-documented and quickly available.
6. Minimal Attack Surface
Linux distributions can be customized to include only the necessary components, reducing the attack surface. Users can install a minimal version of Linux with only the essential software, which reduces the number of potential vulnerabilities.
Many server-focused Linux distributions, such as CentOS or Ubuntu Server, come with fewer default applications, reducing the chances of exploitable vulnerabilities.
7. Robust Package Management
Package managers like apt, yum, and dnf ensure that software installed on Linux is vetted and comes from trusted repositories. This reduces the risk of installing malicious or untrusted software.
Additionally, Linux distributions often come with tools to verify the integrity of installed packages and update software automatically.
8. Lower Target for Malware
Popularity in Specific Use Cases: While Linux is widely used for servers, many personal users still prefer other operating systems (like Windows). This makes Linux less of a target for mass-market malware.
Open-Source Security Tools: Many Linux distributions have strong built-in security tools, and the OS itself is often the platform for security professionals and penetration testers, further boosting its reputation as a secure platform.
9. Security by Design
Linux has security mechanisms built into its design, such as:
Stack Protection: Linux uses techniques like stack canaries and non-executable memory to prevent stack-based buffer overflow attacks.
Data Execution Prevention (DEP): This feature prevents code from executing in areas of memory that should contain only data.
Address Space Layout Randomization (ASLR): Randomizing memory addresses for processes makes it harder for attackers to predict the location of critical system functions.
10. Regular Security Audits and Penetration Testing
Since many security professionals and ethical hackers use Linux, the system is often subjected to rigorous security testing. This helps find vulnerabilities before they are exploited in real-world attacks.
Conclusion
Linux's security is driven by its open-source nature, strong access controls, and a thriving community that quickly identifies and fixes vulnerabilities. Combined with its robust security tools, regular updates, and user-centric design, it offers a highly secure environment, making it a popular choice for critical applications like web servers, networking, and cloud computing. However, like any system, its security ultimately depends on how it's configured and maintained.
for more details please visit
www.qcsdclabs.com,
www.hawkstack.com
0 notes
Video
youtube
How to Install Docker and Create, Use, or Delete Docker Images
In this video we will install docker on a Linux Debian 12 server, then we will create a simple app, build a docker image and run the app on the docker image and after all we remove the image and then uninstall docker from the server completely. The commands we will use for this task go following.
# Update your package list: sudo apt update
# Install necessary packages: sudo apt install apt-transport-https ca-certificates curl software-properties-common
# Add Docker’s official GPG key: curl -fsSL https://download.docker.com/linux/debian/gpg | sudo gpg --dearmor -o /usr/share/keyrings/docker-archive-keyring.gpg
# Set up the stable repository: echo "deb [arch=$(dpkg --print-architecture) signed-by=/usr/share/keyrings/docker-archive-keyring.gpg] https://download.docker.com/linux/debian $(lsb_release -cs) stable" | sudo tee /etc/apt/sources.list.d/docker.list > /dev/null
# Update the package list again to include Docker's repository: sudo apt update
# Install Docker: sudo apt install docker-ce docker-ce-cli containerd.io
# Verify the installation: sudo systemctl status docker
# You should see Docker running. You can also verify by running: sudo docker --version
# (Optional) Allow your user to run Docker commands without sudo: sudo usermod -aG docker $USER Log out and log back in for the group membership to be re-evaluated.
0 notes
Text
VirtualBox is an open-source and free virtualization utility made available by Oracle. It is recognised as one of the finest cross-platform applications for simultaneously creating and running virtual machines within an operating system. It is compatible with the majority of major Operating Systems, including macOS, Windows, and Linux. This post will assist you in installing VirtualBox on a CentOS 8 system. To install VirtualBox on CentOS, you can follow these steps: Update the system: Open a terminal and run the following command to update the package lists and upgrade existing packages: sqlCopy code sudo yum update Add the VirtualBox repository: Download and install the VirtualBox repository configuration package by running the following command: rubyCopy code sudo wget https://download.virtualbox.org/virtualbox/rpm/el/virtualbox.repo -P /etc/yum.repos.d/ Install VirtualBox: Use the following command to install VirtualBox and its dependencies: Copy code sudo yum install VirtualBox-6.1 Note: You can change the version number (6.1) in the command above to the latest available version if needed. Install the kernel module package: VirtualBox requires kernel modules to function properly. Install the kernel module package by running the following command: Copy code sudo yum install kernel-devel kernel-headers dkms Start and enable the VirtualBox service: Once the installation is complete, start the VirtualBox service and enable it to start automatically on boot by running the following commands: bashCopy code sudo systemctl start vboxdrv sudo systemctl enable vboxdrv Add your user to the vboxusers group: To allow your user account to access VirtualBox devices, run the following command: phpCopy code sudo usermod -aG vboxusers Replace with your actual username. Reboot your system: It's recommended to reboot your CentOS system after installing VirtualBox to ensure that all necessary services and modules are loaded properly. Launch the VirtualBox To launch the VirtualBox on CentOS 8, Open up your activities menu, search for “VirtualBox”, and from the search results, and select the Virtual box icon as shown in the picture below:
0 notes
Text
Generating a Software Bill of Materials (SBOM) with Open Source Standards and Tooling
Generating a Software Bill of Materials (SBOM) with Open Source Standards and Tooling
Every month there seems to be a new software vulnerability showing up on social media, which causes open source program offices and security teams to start querying their inventories to see how FOSS components they use may impact their organizations. Frequently this information is not available in a consistent format within an organization for automatic querying and may result in a significant…

View On WordPress
#linux add user to group sudo#linux kernel 5.7#linux kernel version#linux mint download mirrors#linux unzip multiple files
0 notes
Text
How to Add Users to Groups in Linux
In Linux, groups are collections of users that share common permissions and access to files, directories, and system resources. Adding a user to a group allows them to inherit the permissions of the group and collaborate with other members more efficiently. In this blog, we will cover the steps involved in adding a user to a group in Linux and provide examples for different distributions. Linux…

View On WordPress
#access#add#command#create#delete#example.#groups#groups command#id#linux#manage#permissions#primary#remove#resources#secondary#sudo#user#useradd
0 notes
Text
Rhel Docker

Rhel Docker
Rhel Docker Ce
Rhel Docker
Rhel Docker Ce
The Remote - Containers extension lets you use a Docker container as a full-featured development environment. Whether you deploy to containers or not, containers make a great development environment because you can:
Develop with a consistent, easily reproducible toolchain on the same operating system you deploy to.
Quickly swap between different, isolated development environments and safely make updates without worrying about impacting your local machine.
Make it easy for new team members / contributors to get up and running in a consistent development environment.
Try out new technologies or clone a copy of a code base without impacting your local setup.
Rhel Docker
Rhel Docker Ce
The extension starts (or attaches to) a development container running a well defined tool and runtime stack. Workspace files can be mounted into the container from the local file system, or copied or cloned into it once the container is running. Extensions are installed and run inside the container where they have full access to the tools, platform, and file system.
Rhel Docker
Amazon Web Services (AWS) and Red Hat provide a complete, enterprise-class computing environment. Red Hat solutions on AWS give customers the ability to run enterprise traditional on-premises applications, such as SAP, Oracle databases, and custom applications in the cloud.
Windows 10 Home (2004+) requires Docker Desktop 2.2+ and the WSL2 back-end. (Docker Toolbox is not supported.) macOS: Docker Desktop 2.0+. Linux: Docker CE/EE 18.06+ and Docker Compose 1.21+. (The Ubuntu snap package is not supported.) Containers: x8664 / ARMv7l (AArch32) / ARMv8l (AArch64) Debian 9+, Ubuntu 16.04+, CentOS / RHEL 7+ x8664.
Docker volumes allow you to back up, restore, and migrate data easily. This tutorial explains what a Docker volume is and how to use it, as well as how to mount a volume in Docker.
Amazon Web Services (AWS) and Red Hat provide a complete, enterprise-class computing environment. Red Hat solutions on AWS give customers the ability to run enterprise traditional on-premises applications, such as SAP, Oracle databases, and custom applications in the cloud.
You then work with VS Code as if everything were running locally on your machine, except now they are isolated inside a container.
System Requirements
Local:
Windows:Docker Desktop 2.0+ on Windows 10 Pro/Enterprise. Windows 10 Home (2004+) requires Docker Desktop 2.2+ and the WSL2 back-end. (Docker Toolbox is not supported.)
macOS: Docker Desktop 2.0+.
Linux: Docker CE/EE 18.06+ and Docker Compose 1.21+. (The Ubuntu snap package is not supported.)
Containers:
x86_64 / ARMv7l (AArch32) / ARMv8l (AArch64) Debian 9+, Ubuntu 16.04+, CentOS / RHEL 7+
x86_64 Alpine Linux 3.9+
Other glibc based Linux containers may work if they have needed prerequisites.
While ARMv7l (AArch32), ARMv8l (AArch64), and musl based Alpine Linux support is available, some extensions installed on these devices may not work due to the use of glibc or x86 compiled native code in the extension. See the Remote Development with Linux article for details.
Note that while the Docker CLI is required, the Docker daemon/service does not need to be running locally if you are using a remote Docker host.
Installation
To get started, follow these steps:
Install VS Code or VS Code Insiders and this extension.
Install and configure Docker for your operating system.
Windows / macOS:
Install Docker Desktop for Mac/Windows.
If not using WSL2 on Windows, right-click on the Docker task bar item, select Settings / Preferences and update Resources > File Sharing with any locations your source code is kept. See tips and tricks for troubleshooting.
To enable the Windows WSL2 back-end: Right-click on the Docker taskbar item and select Settings. Check Use the WSL2 based engine and verify your distribution is enabled under Resources > WSL Integration.
Linux:
Follow the official install instructions for Docker CE/EE. If you use Docker Compose, follow the Docker Compose install directions.
Add your user to the docker group by using a terminal to run: sudo usermod -aG docker $USER Sign out and back in again so this setting takes effect.
Rhel Docker Ce
Working with Git? Here are two tips to consider:
If you are working with the same repository folder in a container and Windows, be sure to set up consistent line endings. See tips and tricks to learn how.
If you clone using a Git credential manager, your container should already have access to your credentials! If you use SSH keys, you can also opt-in to sharing them. See Sharing Git credentials with your container for details.
Getting started
Follow the step-by-step tutorial or if you are comfortable with Docker, follow these four steps:
Follow the installation steps above.
Clone https://github.com/Microsoft/vscode-remote-try-node locally.
Start VS Code
Run the Remote-Containers: Open Folder in Container... command and select the local folder.
Check out the repository README for things to try. Next, learn how you can:
Use a container as your full-time environment - Open an existing folder in a container for use as your full-time development environment in few easy steps. Works with both container and non-container deployed projects.
Attach to a running container - Attach to a running container for quick edits, debugging, and triaging.
Advanced: Use a remote Docker host - Once you know the basics, learn how to use a remote Docker host if needed.
Available commands
Another way to learn what you can do with the extension is to browse the commands it provides. Press F1 to bring up the Command Palette and type in Remote-Containers for a full list of commands.
You can also click on the Remote 'Quick Access' status bar item to get a list of the most common commands.
For more information, please see the extension documentation.
Release Notes
While an optional install, this extension releases with VS Code. VS Code release notes include a summary of changes to all three Remote Development extensions with a link to detailed release notes.
As with VS Code itself, the extensions update during a development iteration with changes that are only available in VS Code Insiders Edition.
Questions, Feedback, Contributing
Have a question or feedback?
See the documentation or the troubleshooting guide.
Up-vote a feature or request a new one, search existing issues, or report a problem.
Contribute a development container definition for others to use
Contribute to our documentation
...and more. See our CONTRIBUTING guide for details.
Or connect with the community...
Telemetry
Visual Studio Code Remote - Containers and related extensions collect telemetry data to help us build a better experience working remotely from VS Code. We only collect data on which commands are executed. We do not collect any information about image names, paths, etc. The extension respects the telemetry.enableTelemetry setting which you can learn more about in the Visual Studio Code FAQ.
License
By downloading and using the Visual Studio Remote - Containers extension and its related components, you agree to the product license terms and privacy statement.
2 notes
·
View notes
Text
How to install QEMU/KVM and create a Windows 10 virtual machine on Debian
If you’re using Linux, you don’t need VirtualBox or VMware to create virtual machines.
You can use KVM – the kernel-based virtual machine – to run both Windows and Linux in virtual machines.
You can use KVM directly or with other command-line tools, but the graphical Virtual Machine Manager (Virt-Manager) application will feel most familiar to people that have used other virtual machine programs.
Virtual machines are amazing for two reasons! They completely defuse the argument over having to choose which operating system to use, because you can use them all.
However, online tutorials are only cool as long as they stay up-to-date, and the reason for this blog entry is that I’ve noticed a lot of KVM tutorials online are around 2017, use old packages, old commands, or are just plain obsolete. This blog post attempts to remedy this by offering a solution that is current for Debian in 2021.
I wanted to install a Windows 10 virtual machine on my Debian build. To begin with, you’re going to need an up-to-date copy of Windows 10 in an ISO. You can download that directly from Microsoft at https://www.microsoft.com/en-us/software-download/windows10ISO
Now open your Terminal.
Can You Go Virtual?
KVM only works if your CPU has hardware virtualization support – either Intel VT-x or AMD-V. There are two commands that can be run to determine if you have hardware virtualization support.
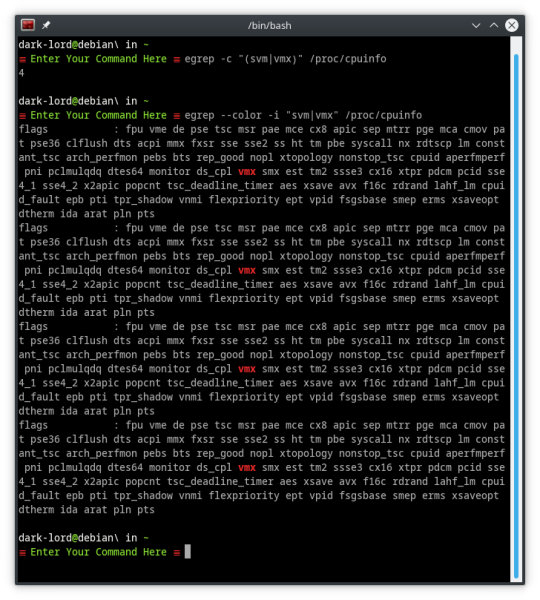
egrep -c "(svm|vmx)" /proc/cpuinfo
This command will count the number of processor cores that can run svm or vmx virtualization. The resulting answer MUST be higher than 0.
egrep --color -i "svm|vmx" /proc/cpuinfo
This command lists all the processor modes in /cpuinfo and highlights either svm or vmx. If you don’t see at least one of those modes highlighted, abort!
Let’s Install QEMU/KVM
Once you’ve confirmed that your computer supports virtualization, let’s move on to the actual install process.
QEMU/KVM needs libvirt installed to work correctly. Older tutorials advised installing the package libvirt-bin; this package, it seems, no longer exists in Debian repos.
Instead of trying to figure out by trial-and-error which libvirt package to install, we’re going to ignore the libvirt requirement for the moment, and let APT choose which package and version to install
sudo apt install qemu-kvm bridge-utils virt-manager
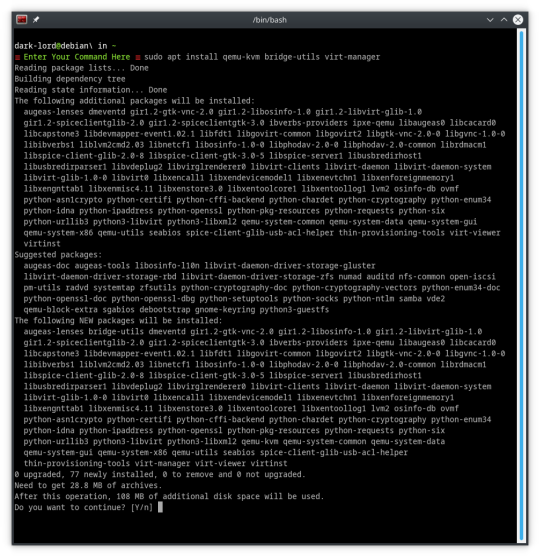
And it looks like that worked! APT traced the package tree and figured out that we need libvirt0 and will install it to satisfy the dependencies.
Don’t Get More Complicated
Other, older, tutorials I’ve seen advise adding the user to the libvirtd group. However, as we’ve already seen, libvirt packages moved on, and it seems libvirtd did too.
There is no need to add your user to the libvirtd group, because there is no libvirtd group, and you don’t need to be a member of this group to run virtual machines.
The only requirement at this point is that you must run any virtual-machine as root or sudo.

When you first run virt-manager, it will ask you to enter your root or sudo password to connect to QEMU/KVM
Installing Windows 10 in a Virtual Environment
Now, down to business!
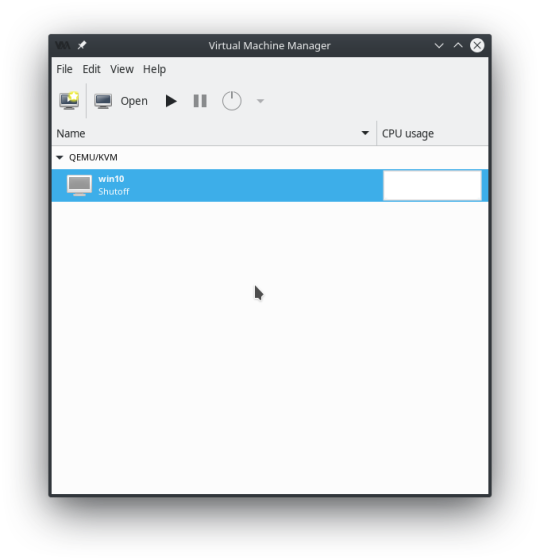
The Virtual Machine Manager window likely looks like this.
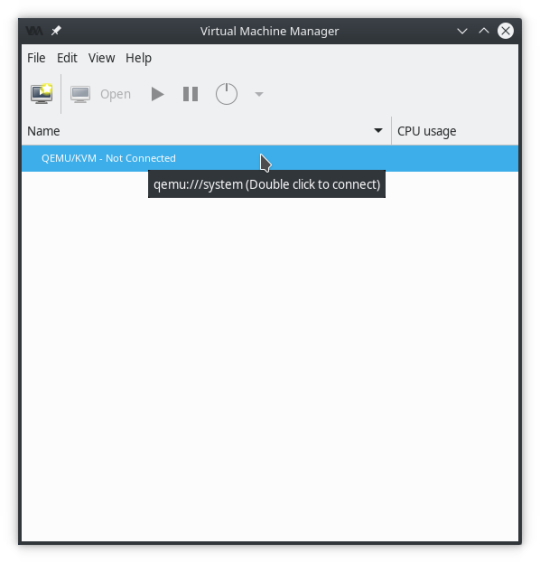
Do what it says. Double Click! Once the “Not Connected” message goes away, QEMU/KVM is ready to be built and virtualized on.
Right-click on QEMU/KVM and click “New”
This will create a New Virtual Machine, that will have QEMU/KVM as its hypervisor.

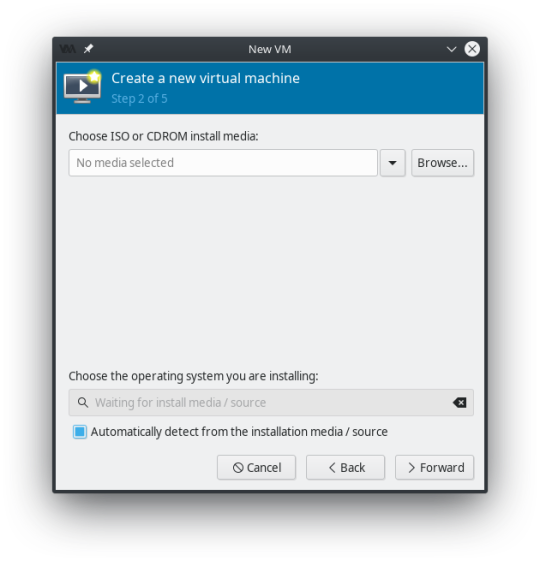
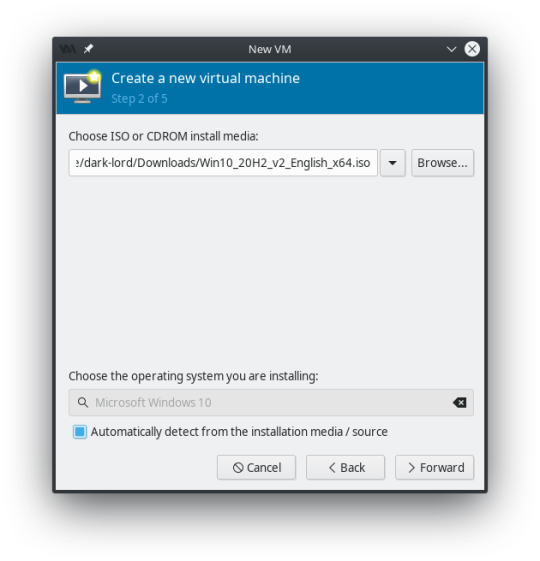
Remember that Windows 10 ISO we downloaded at the beginning of all this? We’re going to Browse to find it... and click “Choose Volume” when it’s selected.

This should automatically detect that it’s a Windows 10 ISO and select the operating system type below. However, if it doesn’t uncheck the box “Automatically detect from the installation media / source” and find the operating system you are installing.
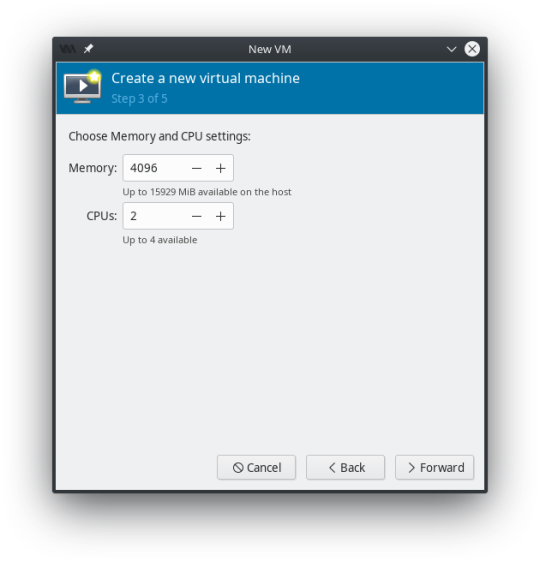
You can change your Memory and CPU settings to whatever you prefer at this point. Remember to keep a little in reserve for the host system. I changed mine to 8192 Memory, and 3 CPU’s

For Step 4 set up your storage! 40 GiB should be considered a minimum for Windows 10, as Microsoft loves their bloatware!

Step 5 summarizes all the details you entered on steps 1-4.
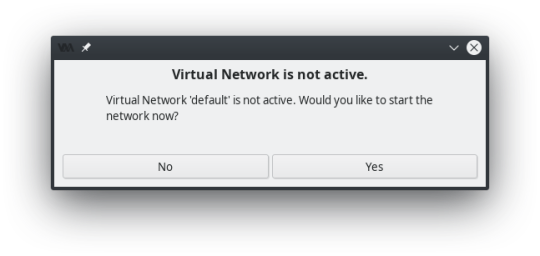
If this pops up when you hit finish, YES, you need the Virtual Network active...
This brings you to the main configuration screen. Click “Begin Installation” at the top of the window... Windows 10 will begin installing.
Now we wait...
And wait...
And wait...
Windows 10 takes a long time to install compared to Linux distros doesn’t it?
Making External Connections
So now that Windows 10 is installed, you’ll likely need more than just the barebones operating system to do your work.
Would you like to use Zoom? You’ll need a webcam for that, and that means you’ll need to connect a USB device into your virtual machine and set-up the webcam.
Need to move files quickly in and out of the virtual machine? Plug a USB stick into the computer, and set up a USB connection in the virtual machine so it can access the USB as a drive.
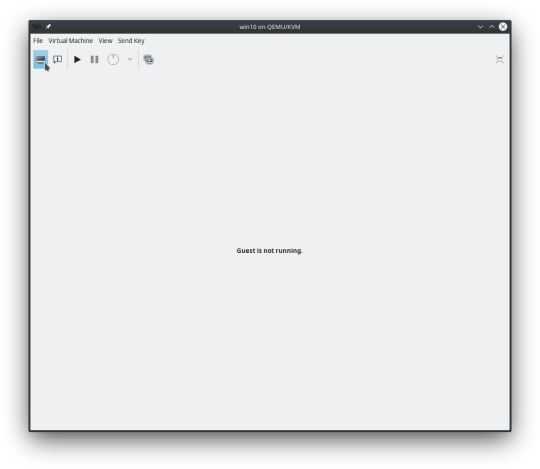
This all happens after Windows 10 is installed, and the virtual machine has been powered off and is inactive. Your hypervisor QEMU/KVM window should look like this.
Double-click on the Virtual Machine to bring up the Overview / Launcher window.

Here you can change all the initial setup options you made, as well as add new options! On the left-side pane at the bottom of the screen, you will see “+ Add Hardware”. Click that to set up a new USB connection.
I’m going to add my existing webcam from Debian into this virtual machine.

Click USB Host Device on the left side, and find the existing USB device on the right side that you want to add to the virtual machine.
As you can see from the picture, I’m adding my webcam, but the entry right below the webcam is for a SanDisk Cruzer USB stick that I could also add (that would work as an external drive in Windows).

When the device is added, you’ll see a new hardware connection in the left-side pane of the virtual machine overview screen.
Switch over to the Graphical Console...
...then click the Play button to start booting your virtual machine and test to make sure the changes you made are working correctly.
1 note
·
View note
Text
How to Install and Use Docker on CentOS

Docker is a containerization technology that allows you to quickly build, test and deploy applications as portable, self-sufficient containers that can run virtually anywhere.
The container is a way to package software along with binaries and settings required to make the software that runs isolated within an operating system.
In this tutorial, we will install Docker CE on CentOS 7 and explore the basic Docker commands and concepts. Let’s GO !
Prerequisites
Before proceeding with this tutorial, make sure that you have installed a CentOS 7 server (You may want to see our tutorial : How to install a CentOS 7 image )
Install Docker on CentOS
Although the Docker package is available in the official CentOS 7 repository, it may not always be the latest version. The recommended approach is to install Docker from the Docker’s repositories.
To install Docker on your CentOS 7 server follow the steps below:
1. Start by updating your system packages and install the required dependencies:
sudo yum update
sudo yum install yum-utils device-mapper-persistent-data lvm2
2. Next, run the following command which will add the Docker stable repository to your system:
sudo yum-config-manager --add-repo https://download.docker.com/linux/centos/docker-ce.repo
3. Now that the Docker repository is enabled, install the latest version of Docker CE (Community Edition) using yum by typing:
sudo yum install docker-ce
4. Once the Docker package is installed, start the Docker daemon and enable it to automatically start at boot time:
sudo systemctl start dockersudo systemctl enable docker
5. To verify that the Docker service is running type:
sudo systemctl status docker
6. The output should look something like this:
● docker.service - Docker Application Container Engine Loaded: loaded (/usr/lib/systemd/system/docker.service; enabled; vendor preset: disabled) Active: active (running) since Wed 2018-10-31 08:51:20 UTC; 7s ago Docs: https://docs.docker.com Main PID: 2492 (dockerd) CGroup: /system.slice/docker.service ├─2492 /usr/bin/dockerd └─2498 docker-containerd --config /var/run/docker/containerd/containerd.toml
At the time of writing, the current stable version of Docker is, 18.06.1, to print the Docker version type:
docker -v
Docker version 18.06.1-ce, build e68fc7a
Executing the Docker Command Without Sudo
By default managing, Docker requires administrator privileges. If you want to run Docker commands as a non-root user without prepending sudo you need to add your user to the docker group which is created during the installation of the Docker CE package. You can do that by typing:
sudo usermod -aG docker $USER
$USER is an environnement variable that holds your username.
Log out and log back in so that the group membership is refreshed.
To verify Docker is installed successfully and that you can run docker commands without sudo, issue the following command which will download a test image, run it in a container, print a “Hello from Docker” message and exit:
docker container run hello-world
The output should look like the following:
Unable to find image 'hello-world:latest' locally latest: Pulling from library/hello-world 9bb5a5d4561a: Pull complete Digest: sha256:f5233545e43561214ca4891fd1157e1c3c563316ed8e237750d59bde73361e77 Status: Downloaded newer image for hello-world:latest Hello from Docker! This message shows that your installation appears to be working correctly.
Docker command line interface
Now that we have a working Docker installation, let’s go over the basic syntax of the docker CLI.
The docker command line take the following form:
docker [option] [subcommand] [arguments]
You can list all available commands by typing docker with no parameters:
docker
If you need more help on any [subcommand], just type:
docker [subcommand] --help
Docker Images
A Docker image is made up of a series of layers representing instructions in the image’s Dockerfile that make up an executable software application. An image is an immutable binary file including the application and all other dependencies such as binaries, libraries, and instructions necessary for running the application. In short, a Docker image is essentially a snapshot of a Docker container.
The Docker Hub is cloud-based registry service which among other functionalities is used for keeping the Docker images either in a public or private repository.
To search the Docker Hub repository for an image just use the search subcommand. For example, to search for the CentOS image, run:
docker search centos
The output should look like the following:
NAME DESCRIPTION STARS OFFICIAL AUTOMATED centos The official build of CentOS. 4257 [OK] ansible/centos7-ansible Ansible on Centos7 109 [OK] jdeathe/centos-ssh CentOS-6 6.9 x86_64 / CentOS-7 7.4.1708 x86_… 94 [OK] consol/centos-xfce-vnc Centos container with "headless" VNC session… 52 [OK] imagine10255/centos6-lnmp-php56 centos6-lnmp-php56 40 [OK] tutum/centos Simple CentOS docker image with SSH access 39
As you can see the search results prints a table with five columns, NAME, DESCRIPTION, STARS, OFFICIAL and AUTOMATED. The official image is an image that Docker develops in conjunction with upstream partners.
If we want to download the official build of CentOS 7, we can do that by using the image pull subcommand:
docker image pull centos
Using default tag: latest latest: Pulling from library/centos 469cfcc7a4b3: Pull complete Digest: sha256:989b936d56b1ace20ddf855a301741e52abca38286382cba7f44443210e96d16 Status: Downloaded newer image for centos:latest
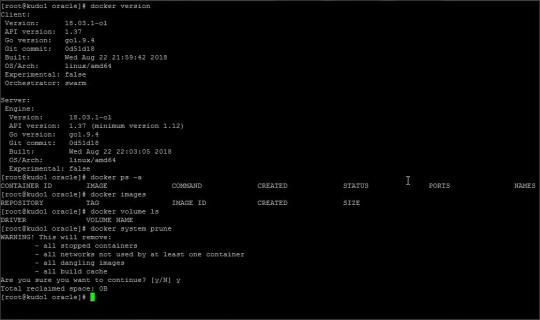
Depending on your Internet speed, the download may take a few seconds or a few minutes. Once the image is downloaded we can list the images with:
docker image ls
The output should look something like the following:
REPOSITORY TAG IMAGE ID CREATED SIZE hello-world latest e38bc07ac18e 3 weeks ago 1.85kB centos latest e934aafc2206 4 weeks ago 199MB
If for some reason you want to delete an image you can do that with the image rm [image_name] subcommand:
docker image rm centos
Untagged: centos:latest Untagged: centos@sha256:989b936d56b1ace20ddf855a301741e52abca38286382cba7f44443210e96d16 Deleted: sha256:e934aafc22064b7322c0250f1e32e5ce93b2d19b356f4537f5864bd102e8531f Deleted: sha256:43e653f84b79ba52711b0f726ff5a7fd1162ae9df4be76ca1de8370b8bbf9bb0
Docker Containers
An instance of an image is called a container. A container represents a runtime for a single application, process, or service.
It may not be the most appropriate comparison but if you are a programmer you can think of a Docker image as class and Docker container as an instance of a class.
We can start, stop, remove and manage a container with the docker container subcommand.
The following command will start a Docker container based on the CentoOS image. If you don’t have the image locally, it will download it first:
docker container run centos
At first sight, it may seem to you that nothing happened at all. Well, that is not true. The CentOS container stops immediately after booting up because it does not have a long-running process and we didn’t provide any command, so the container booted up, ran an empty command and then exited.
The switch -it allows us to interact with the container via the command line. To start an interactive container type:
docker container run -it centos /bin/bash
As you can see from the output once the container is started the command prompt is changed which means that you’re now working from inside the container:
[root@719ef9304412 /]#
To list running containers: , type:
docker container ls
CONTAINER ID IMAGE COMMAND CREATED STATUS PORTS NAMES 79ab8e16d567 centos "/bin/bash" 22 minutes ago Up 22 minutes ecstatic_ardinghelli
If you don’t have any running containers the output will be empty.
To view both running and stopped containers, pass it the -a switch:
docker container ls -a
CONTAINER ID IMAGE COMMAND CREATED STATUS PORTS NAMES 79ab8e16d567 centos "/bin/bash" 22 minutes ago Up 22 minutes ecstatic_ardinghelli c55680af670c centos "/bin/bash" 30 minutes ago Exited (0) 30 minutes ago modest_hawking c6a147d1bc8a hello-world "/hello" 20 hours ago Exited (0) 20 hours ago sleepy_shannon
To delete one or more containers just copy the container ID (or IDs) from above and paste them after the container rm subcommand:
docker container rm c55680af670c
Conclusion
You have learned how to install Docker on your CentOS 7 machine and how to download Docker images and manage Docker containers.
This tutorial barely scratches the surface of the Docker ecosystem. In some of our next articles, we will continue to dive into other aspects of Docker. To learn more about Docker check out the official Docker documentation.
If you have any questions or remark, please leave a comment .
2 notes
·
View notes
Text
Installing Nginx, MySQL, PHP (LEMP) Stack on Ubuntu 18.04

Ubuntu Server 18.04 LTS (TunzaDev) is finally here and is being rolled out across VPS hosts such as DigitalOcean and AWS. In this guide, we will install a LEMP Stack (Nginx, MySQL, PHP) and configure a web server.
Prerequisites
You should use a non-root user account with sudo privileges. Please see the Initial server setup for Ubuntu 18.04 guide for more details.
1. Install Nginx
Let’s begin by updating the package lists and installing Nginx on Ubuntu 18.04. Below we have two commands separated by &&. The first command will update the package lists to ensure you get the latest version and dependencies for Nginx. The second command will then download and install Nginx.
sudo apt update && sudo apt install nginx
Once installed, check to see if the Nginx service is running.
sudo service nginx status
If Nginx is running correctly, you should see a green Active state below.
● nginx.service - A high performance web server and a reverse proxy server Loaded: loaded (/lib/systemd/system/nginx.service; enabled; vendor preset: enabled) Active: active (running) since Wed 2018-05-09 20:42:29 UTC; 2min 39s ago Docs: man:nginx(8) Process: 27688 ExecStart=/usr/sbin/nginx -g daemon on; master_process on; (code=exited, status=0/SUCCESS) Process: 27681 ExecStartPre=/usr/sbin/nginx -t -q -g daemon on; master_process on; (code=exited, status=0/SUCCESS) Main PID: 27693 (nginx) Tasks: 2 (limit: 1153) CGroup: /system.slice/nginx.service ├─27693 nginx: master process /usr/sbin/nginx -g daemon on; master_process on; └─27695 nginx: worker process
You may need to press q to exit the service status.
2. Configure Firewall
If you haven’t already done so, it is recommended that you enable the ufw firewall and add a rule for Nginx. Before enabling ufw firewall, make sure you add a rule for SSH, otherwise you may get locked out of your server if you’re connected remotely.
sudo ufw allow OpenSSH
If you get an error “ERROR: could find a profile matching openSSH”, this probably means you are not configuring the server remotely and can ignore it.
Now add a rule for Nginx.
sudo ufw allow 'Nginx HTTP'
Rule added Rule added (v6)
Enable ufw firewall.
sudo ufw enable
Press y when asked to proceed.
Now check the firewall status.
sudo ufw status
Status: active To Action From -- ------ ---- OpenSSH ALLOW Anywhere Nginx HTTP ALLOW Anywhere OpenSSH (v6) ALLOW Anywhere (v6) Nginx HTTP (v6) ALLOW Anywhere (v6)
That’s it! Your Nginx web server on Ubuntu 18.04 should now be ready.
3. Test Nginx
Go to your web browser and visit your domain or IP. If you don’t have a domain name yet and don’t know your IP, you can find out with:
sudo ifconfig | grep -Eo 'inet (addr:)?([0-9]*\.){3}[0-9]*' | grep -Eo '([0-9]*\.){3}[0-9]*' | grep -v '127.0.0.1'
You can find this Nginx default welcome page in the document root directory /var/www/html. To edit this file in nano text editor:
sudo nano /var/www/html/index.nginx-debian.html
To save and close nano, press CTRL + X and then press y and ENTER to save changes.
Your Nginx web server is ready to go! You can now add your own html files and images the the /var/www/html directory as you please.
However, you should acquaint yourself with and set up at least one Server Block for Nginx as most of our Ubuntu 18.04 guides are written with Server Blocks in mind. Please see article Installing Nginx on Ubuntu 18.04 with Multiple Domains. Server Blocks allow you to host multiple web sites/domains on one server. Even if you only ever intend on hosting one website or one domain, it’s still a good idea to configure at least one Server Block.
If you don’t want to set up Server Blocks, continue to the next step to set up MySQL.
4. Install MySQL
Let’s begin by updating the package lists and installing MySQL on Ubuntu 18.04. Below we have two commands separated by &&. The first command will update the package lists to ensure you get the latest version and dependencies for MySQL. The second command will then download and install MySQL.
sudo apt update && sudo apt install mysql-server
Press y and ENTER when prompted to install the MySQL package.
Once the package installer has finished, we can check to see if the MySQL service is running.
sudo service mysql status
If running, you will see a green Active status like below.
● mysql.service - MySQL Community Server Loaded: loaded (/lib/systemd/system/mysql.service; enabled; vendor preset: enabled) Active: active (running) since since Wed 2018-05-09 21:10:24 UTC; 16s ago Main PID: 30545 (mysqld) Tasks: 27 (limit: 1153) CGroup: /system.slice/mysql.service └─30545 /usr/sbin/mysqld --daemonize --pid-file=/run/mysqld/mysqld.pid
You may need to press q to exit the service status.
5. Configure MySQL Security
You should now run mysql_secure_installation to configure security for your MySQL server.
sudo mysql_secure_installation
If you created a root password in Step 1, you may be prompted to enter it here. Otherwise you will be asked to create one. (Generate a password here)
You will be asked if you want to set up the Validate Password Plugin. It’s not really necessary unless you want to enforce strict password policies for some reason.
Securing the MySQL server deployment. Connecting to MySQL using a blank password. VALIDATE PASSWORD PLUGIN can be used to test passwords and improve security. It checks the strength of password and allows the users to set only those passwords which are secure enough. Would you like to setup VALIDATE PASSWORD plugin? Press y|Y for Yes, any other key for No:
Press n and ENTER here if you don’t want to set up the validate password plugin.
Please set the password for root here. New password: Re-enter new password:
If you didn’t create a root password in Step 1, you must now create one here.
Generate a strong password and enter it. Note that when you enter passwords in Linux, nothing will show as you are typing (no stars or dots).
By default, a MySQL installation has an anonymous user, allowing anyone to log into MySQL without having to have a user account created for them. This is intended only for testing, and to make the installation go a bit smoother. You should remove them before moving into a production environment. Remove anonymous users? (Press y|Y for Yes, any other key for No) :
Press y and ENTER to remove anonymous users.
Normally, root should only be allowed to connect from 'localhost'. This ensures that someone cannot guess at the root password from the network. Disallow root login remotely? (Press y|Y for Yes, any other key for No) :
Press y and ENTER to disallow root login remotely. This will prevent bots and hackers from trying to guess the root password.
By default, MySQL comes with a database named 'test' that anyone can access. This is also intended only for testing, and should be removed before moving into a production environment. Remove test database and access to it? (Press y|Y for Yes, any other key for No) :
Press y and ENTER to remove the test database.
Reloading the privilege tables will ensure that all changes made so far will take effect immediately. Reload privilege tables now? (Press y|Y for Yes, any other key for No) :
Press y and ENTER to reload the privilege tables.
All done!
As a test, you can log into the MySQL server and run the version command.
sudo mysqladmin -p -u root version
Enter the MySQL root password you created earlier and you should see the following:
mysqladmin Ver 8.42 Distrib 5.7.22, for Linux on x86_64 Copyright (c) 2000, 2018, Oracle and/or its affiliates. All rights reserved. Oracle is a registered trademark of Oracle Corporation and/or its affiliates. Other names may be trademarks of their respective owners. Server version 5.7.22-0ubuntu18.04.1 Protocol version 10 Connection Localhost via UNIX socket UNIX socket /var/run/mysqld/mysqld.sock Uptime: 4 min 28 sec Threads: 1 Questions: 15 Slow queries: 0 Opens: 113 Flush tables: 1 Open tables: 106 Queries per second avg: 0.055
You have now successfully installed and configured MySQL for Ubuntu 18.04! Continue to the next step to install PHP.
6. Install PHP
Unlike Apache, Nginx does not contain native PHP processing. For that we have to install PHP-FPM (FastCGI Process Manager). FPM is an alternative PHP FastCGI implementation with some additional features useful for heavy-loaded sites.
Let’s begin by updating the package lists and installing PHP-FPM on Ubuntu 18.04. We will also install php-mysql to allow PHP to communicate with the MySQL database. Below we have two commands separated by &&. The first command will update the package lists to ensure you get the latest version and dependencies for PHP-FPM and php-mysql. The second command will then download and install PHP-FPM and php-mysql. Press y and ENTER when asked to continue.
sudo apt update && sudo apt install php-fpm php-mysql
Once installed, check the PHP version.
php --version
If PHP was installed correctly, you should see something similar to below.
PHP 7.2.3-1ubuntu1 (cli) (built: Mar 14 2018 22:03:58) ( NTS ) Copyright (c) 1997-2018 The PHP Group Zend Engine v3.2.0, Copyright (c) 1998-2018 Zend Technologies with Zend OPcache v7.2.3-1ubuntu1, Copyright (c) 1999-2018, by Zend Technologies
Above we are using PHP version 7.2, though this may be a later version for you.
Depending on what version of Nginx and PHP you install, you may need to manually configure the location of the PHP socket that Nginx will connect to.
List the contents for the directory /var/run/php/
ls /var/run/php/
You should see a few entries here.
php7.2-fpm.pid php7.2-fpm.sock
Above we can see the socket is called php7.2-fpm.sock. Remember this as you may need it for the next step.
7. Configure Nginx for PHP
We now need to make some changes to our Nginx server block.
The location of the server block may vary depending on your setup. By default, it is located in /etc/nginx/sites-available/default.
However, if you have previously set up custom server blocks for multiple domains in one of our previous guides, you will need to add the PHP directives to each server block separately. A typical custom server block file location would be /etc/nginx/sites-available/mytest1.com.
For the moment, we will assume you are using the default. Edit the file in nano.
sudo nano /etc/nginx/sites-available/default
Press CTRL + W and search for index.html.
Now add index.php before index.html
/etc/nginx/sites-available/default
index index.php index.html index.htm index.nginx-debian.html;
Press CTRL + W and search for the line server_name.
Enter your server’s IP here or domain name if you have one.
/etc/nginx/sites-available/default
server_name YOUR_DOMAIN_OR_IP_HERE;
Press CTRL + W and search for the line location ~ \.php.
You will need to uncomment some lines here by removing the # signs before the lines marked in red below.
Also ensure value for fastcgi_pass socket path is correct. For example, if you installed PHP version 7.2, the socket should be: /var/run/php/php7.2-fpm.sock
If you are unsure which socket to use here, exit out of nano and run ls /var/run/php/
/etc/nginx/sites-available/default
... location ~ \.php$ { include snippets/fastcgi-php.conf; # # # With php-fpm (or other unix sockets): fastcgi_pass unix:/var/run/php/php7.2-fpm.sock; # # With php-cgi (or other tcp sockets): # fastcgi_pass 127.0.0.1:9000; } ...
Once you’ve made the necessary changes, save and close (Press CTRL + X, then press y and ENTER to confirm save)
Now check the config file to make sure there are no syntax errors. Any errors could crash the web server on restart.
sudo nginx -t
nginx: the configuration file /etc/nginx/nginx.conf syntax is ok nginx: configuration file /etc/nginx/nginx.conf test is successful
If no errors, you can reload the Nginx config.
sudo service nginx reload
8. Test PHP
To see if PHP is working correctly on Ubuntu 18.04, let’s a create a new PHP file called info.php in the document root directory. By default, this is located in /var/www/html/, or if you set up multiple domains in a previous guide, it may be located in somewhere like /var/www/mytest1.com/public_html
Once you have the correct document root directory, use the nano text editor to create a new file info.php
sudo nano /var/www/html/info.php
Type or paste the following code into the new file. (if you’re using PuTTY for Windows, right-click to paste)
/var/www/html/info.php
Save and close (Press CTRL + X, then press y and ENTER to confirm save)
You can now view this page in your web browser by visiting your server’s domain name or public IP address followed by /info.php: http://your_domain_or_IP/info.php
phpinfo() outputs a large amount of information about the current state of PHP. This includes information about PHP compilation options and extensions, the PHP version and server information.
You have now successfully installed PHP-FPM for Nginx on Ubuntu 18.04 LTS (Bionic Beaver).
Make sure to delete info.php as it contains information about the web server that could be useful to attackers.
sudo rm /var/www/html/info.php
What Next?
Now that your Ubuntu 18.04 LEMP web server is up and running, you may want to install phpMyAdmin so you can manage your MySQL server.
Installing phpMyAdmin for Nginx on Ubuntu 18.04
To set up a free SSL cert for your domain:
Configuring Let’s Encrypt SSL Cert for Nginx on Ubuntu 18.04
You may want to install and configure an FTP server
Installing an FTP server with vsftpd (Ubuntu 18.04)
We also have several other articles relating to the day-to-day management of your Ubuntu 18.04 LEMP server
Hey champ! - You’re all done!
Feel free to ask me any questions in the comments below.
Let me know in the comments if this helped. Follow Us on - Twitter - Facebook - YouTube.
1 note
·
View note
Text
Debian 12 initial server setup on a VPS/Cloud server

After deploying your Debian 12 server on your cloud provider, here are some extra steps you should take to secure your Debian 12 server. Here are some VPS providers we recommend. https://youtu.be/bHAavM_019o The video above follows the steps on this page , to set up a Debian 12 server from Vultr Cloud. Get $300 Credit from Vultr Cloud
Prerequisites
- Deploy a Debian 12 server. - On Windows, download and install Git. You'll use Git Bash to log into your server and carry out these steps. - On Mac or Linux, use your terminal to follow along.
1 SSH into server
Open Git Bash on Windows. Open Terminal on Mac/ Linux. SSH into your new server using the details provided by your cloud provider. Enter the correct user and IP, then enter your password. ssh root@my-server-ip After logging in successfully, update the server and install certain useful apps (they are probably already installed). apt update && apt upgrade -y apt install vim curl wget sudo htop -y
2 Create admin user
Using the root user is not recommended, you should create a new sudo user on Debian. In the commands below, Change the username as needed. adduser yournewuser #After the above user is created, add him to the sudo group usermod -aG sudo yournewuser After creating the user and adding them to the sudoers group, test it. Open a new terminal window, log in and try to update the server. if you are requested for a password, enter your user's password. If the command runs successfully, then your admin user is set and ready. sudo apt update && sudo apt upgrade -y
3 Set up SSH Key authentication for your new user
Logging in with an SSH key is favored over using a password. Step 1: generate SSH key This step is done on your local computer (not on the server). You can change details for the folder name and ssh key name as you see fit. # Create a directory for your key mkdir -p ~/.ssh/mykeys # Generate the keys ssh-keygen -t ed25519 -f ~/.ssh/mykeys/my-ssh-key1 Note that next time if you create another key, you must give it a different name, eg my-ssh-key2. Now that you have your private and public key generated, let's add them to your server. Step 2: copy public key to your server This step is still on your local computer. Run the following. Replace all the details as needed. You will need to enter the user's password. # ssh-copy-id -i ~/path-to-public-key user@host ssh-copy-id -i ~/.ssh/mykeys/my-ssh-key1.pub yournewuser@your-server-ip If you experience any errors in this part, leave a comment below. Step 3: log in with the SSH key Test that your new admin user can log into your Debian 12 server. Replace the details as needed. ssh yournewuser@server_ip -i ~/.ssh/path-to-private-key Step 4: Disable root user login and Password Authentication The Root user should not be able to SSH into the server, and only key based authentication should be used. echo -e "PermitRootLogin nonPasswordAuthentication no" | sudo tee /etc/ssh/sshd_config.d/mycustom.conf > /dev/null && sudo systemctl restart ssh To explain the above command, we are creating our custom ssh config file (mycustom.conf) inside /etc/ssh/sshd_config.d/ . Then in it, we are adding the rules to disable password authentication and root login. And finally restarting the ssh server. Certain cloud providers also create a config file in the /etc/ssh/sshd_config.d/ directory, check if there are other files in there, confirm the content and delete or move the configs to your custom ssh config file. If you are on Vultr cloud or Hetzner or DigitalOcean run this to disable the 50-cloud-init.conf ssh config file: sudo mv /etc/ssh/sshd_config.d/50-cloud-init.conf /etc/ssh/sshd_config.d/50-cloud-init Test it by opening a new terminal, then try logging in as root and also try logging in the new user via a password. If it all fails, you are good to go.
4 Firewall setup - UFW
UFW is an easier interface for managing your Firewall rules on Debian and Ubuntu, Install UFW, activate it, enable default rules and enable various services #Install UFW sudo apt install ufw #Enable it. Type y to accept when prompted sudo ufw enable #Allow SSH HTTP and HTTPS access sudo ufw allow ssh && sudo ufw allow http && sudo ufw allow https If you want to allow a specific port, you can do: sudo ufw allow 7000 sudo ufw allow 7000/tcp #To delete the rule above sudo ufw delete allow 7000 To learn more about UFW, feel free to search online. Here's a quick UFW tutorial that might help get you to understand how to perform certain tasks.
5 Change SSH Port
Before changing the port, ensure you add your intended SSH port to the firewall. Assuming your new SSH port is 7020, allow it on the firewall: sudo ufw allow 7020/tcp To change the SSH port, we'll append the Port number to the custom ssh config file we created above in Step 4 of the SSH key authentication setup. echo "Port 7020" | sudo tee -a /etc/ssh/sshd_config.d/mycustom.conf > /dev/null && sudo systemctl restart ssh In a new terminal/Git Bash window, try to log in with the new port as follows: ssh yournewuser@your-server-ip -i ~/.ssh/mykeys/my-ssh-key1 -p 7020 #ssh user@server_ip -i ~/.ssh/path-to-private-key -p 7020 If you are able to log in, then that’s perfect. Your server's SSH port has been changed successfully.
6 Create a swap file
Feel free to edit this as much as you need to. The provided command will create a swap file of 2G. You can also change all instances of the name, debianswapfile to any other name you prefer. sudo fallocate -l 2G /debianswapfile ; sudo chmod 600 /debianswapfile ; sudo mkswap /debianswapfile && sudo swapon /debianswapfile ; sudo sed -i '$a/debianswapfile swap swap defaults 0 0' /etc/fstab
7 Change Server Hostname (Optional)
If your server will also be running a mail server, then this step is important, if not you can skip it. Change your mail server to a fully qualified domain and add the name to your etc/hosts file #Replace subdomain.example.com with your hostname sudo hostnamectl set-hostname subdomain.example.com #Edit etc/hosts with your hostname and IP. replace 192.168.1.10 with your IP echo "192.168.1.10 subdomain.example.com subdomain" | sudo tee -a /etc/hosts > /dev/null
8 Setup Automatic Updates
You can set up Unattended Upgrades #Install unattended upgrades sudo apt install unattended-upgrades apt-listchanges -y # Enable unattended upgrades sudo dpkg-reconfigure --priority=low unattended-upgrades # Edit the unattended upgrades file sudo vi /etc/apt/apt.conf.d/50unattended-upgrades In the open file, uncomment the types of updates you want to be updated , for example you can make it look like this : Unattended-Upgrade::Origins-Pattern { ......... "origin=Debian,codename=${distro_codename}-updates"; "origin=Debian,codename=${distro_codename}-proposed-updates"; "origin=Debian,codename=${distro_codename},label=Debian"; "origin=Debian,codename=${distro_codename},label=Debian-Security"; "origin=Debian,codename=${distro_codename}-security,label=Debian-Security"; .......... }; Restart and dry run unattended upgrades sudo systemctl restart unattended-upgrades.service sudo unattended-upgrades --dry-run --debug auto-update 3rd party repositories The format for Debian repo updates in the etc/apt/apt.conf.d/50unattended-upgrades file is as follows "origin=Debian,codename=${distro_codename},label=Debian"; So to update third party repos you need to figure out details for the repo as follows # See the list of all repos ls -l /var/lib/apt/lists/ # Then check details for a specific repo( eg apt.hestiacp.com_dists_bookworm_InRelease) sudo cat /var/lib/apt/lists/apt.hestiacp.com_dists_bookworm_InRelease # Just the upper part is what interests us eg : Origin: apt.hestiacp.com Label: apt repository Suite: bookworm Codename: bookworm NotAutomatic: no ButAutomaticUpgrades: no Components: main # Then replace these details in "origin=Debian,codename=${distro_codename},label=Debian"; # And add the new line in etc/apt/apt.conf.d/50unattended-upgrades "origin=apt.hestiacp.com,codename=${distro_codename},label=apt repository"; There you go. This should cover Debian 12 initial server set up on any VPS or cloud server in a production environment. Additional steps you should look into: - Install and set up Fail2ban - Install and set up crowdsec - Enable your app or website on Cloudflare - Enabling your Cloud provider's firewall, if they have one.
Bonus commands
Delete a user sudo deluser yournewuser sudo deluser --remove-home yournewuser Read the full article
0 notes
Text
Today we will see how to Install JFrog Artifactory on Ubuntu 20.04|18.04|16.04. JFrog Artifactory is the world’s most advanced repository manager designed to integrate with the majority of continuous integration and delivery tools. With JFrog Artifactory, delivering an end to end automated solution with artifacts tracking from development to production becomes a reality. Artifactory is mostly used by build tools such as Maven, Apache Ant, and Gradle to store respective artifacts in its local repository to be consumption by other applications and tools. In our recent guide, we covered the installation of JFrog Artifactory on CentOS 7. Install JFrog Artifactory on Ubuntu The easiest way of installing and running Artifactory on Ubuntu 20.04|18.04|16.04 is by using Docker. The process is straightforward without dependency/permission hurdles. You just install Docker, download Artifactory image and spin a container. Step 1: Install Docker Engine Install Docker using our guide: How to install Docker CE on Ubuntu / Debian / Fedora / Arch / CentOS. For a quick start, here is the process. Install packages to allow apt to use a repository over HTTPS: sudo apt update sudo apt -y install apt-transport-https ca-certificates curl software-properties-common Add Docker’s official GPG key: curl -fsSL https://download.docker.com/linux/ubuntu/gpg | sudo apt-key add - Add stable repository: sudo add-apt-repository "deb [arch=amd64] https://download.docker.com/linux/ubuntu $(lsb_release -cs) stable" Install Docker CE: sudo apt update && sudo apt -y install docker-ce If you would like to use Docker as a non-root user, you should now consider adding your user to the “docker” group with something like: sudo usermod -aG docker $USER Run the command below to see a version of docker installed. $ docker version Client: Docker Engine - Community Version: 20.10.9 API version: 1.41 Go version: go1.16.8 Git commit: c2ea9bc Built: Mon Oct 4 16:08:29 2021 OS/Arch: linux/amd64 Context: default Experimental: true Server: Docker Engine - Community Engine: Version: 20.10.9 API version: 1.41 (minimum version 1.12) Go version: go1.16.8 Git commit: 79ea9d3 Built: Mon Oct 4 16:06:37 2021 OS/Arch: linux/amd64 Experimental: false containerd: Version: 1.4.11 GitCommit: 5b46e404f6b9f661a205e28d59c982d3634148f8 runc: Version: 1.0.2 GitCommit: v1.0.2-0-g52b36a2 docker-init: Version: 0.19.0 GitCommit: de40ad0 Step 2: Download JFrog Artifactory Docker image There are different editions of JFrog Artifactory available, check the Comparison Matrix. If you’re not sure, install the OSS (Open Source Software) version. For more features, you can consider the Pro. Pull the latest Docker image of JFrog Artifactory. docker pull docker.bintray.io/jfrog/artifactory-oss:latest For CE edition: docker pull docker.bintray.io/jfrog/artifactory-cpp-ce Confirm Docker images: $ docker images REPOSITORY TAG IMAGE ID CREATED SIZE docker.bintray.io/jfrog/artifactory-cpp-ce latest 24d943a892ac 43 hours ago 582MB docker.bintray.io/jfrog/artifactory-oss latest 58d49856785f 43 hours ago 582MB Step 3: Create Data Directory Create data directory on host system to ensure data used on container is persistent. sudo mkdir -p /jfrog/artifactory sudo chown -R 1030 /jfrog/ Step 4: Start JFrog Artifactory container To start an Artifactory container, use the command: docker run --name artifactory -d \ -p 8081:8081 \ -p 8082:8082 \ -v /jfrog/artifactory:/var/opt/jfrog/artifactory \ docker.bintray.io/jfrog/artifactory-oss:latest Check container status: $ docker ps CONTAINER ID IMAGE
COMMAND CREATED STATUS PORTS NAMES 1ca55e851bd3 docker.bintray.io/jfrog/artifactory-oss:latest "/entrypoint-artifac…" 4 seconds ago Up 2 seconds 0.0.0.0:8081-8082->8081-8082/tcp, :::8081-8082->8081-8082/tcp artifactory ubuntu@lorna-ubuntu20:~$ docker ps You can pass Java system properties to the JVM running Artifactory using EXTRA_JAVA_OPTIONS. Check more on Docker setup link. See example below. docker run --name artifactory -d \ -p 8081:8081 \ -p 8082:8082 \ -v /jfrog/artifactory:/var/opt/jfrog/artifactory \ -e EXTRA_JAVA_OPTIONS='-Xms512m -Xmx2g -Xss256k -XX:+UseG1GC' \ docker.bintray.io/jfrog/artifactory-pro:latest Step 5: Running JFrog Artifactory container with Systemd Systemd is the default init system for Ubuntu20.04|18.04|16.04. We can use it to manage JFrog Artifactory container. Create Artifactory service unit file. sudo vim /etc/systemd/system/artifactory.service Add: [Unit] Description=Setup Systemd script for Artifactory Container After=network.target [Service] Restart=always ExecStartPre=-/usr/bin/docker kill artifactory ExecStartPre=-/usr/bin/docker rm artifactory ExecStart=/usr/bin/docker run --name artifactory -p 8081:8081 -p 8082:8082 \ -v /jfrog/artifactory:/var/opt/jfrog/artifactory \ docker.bintray.io/jfrog/artifactory-oss:latest ExecStop=-/usr/bin/docker kill artifactory ExecStop=-/usr/bin/docker rm artifactory [Install] WantedBy=multi-user.target Reload systemd. sudo systemctl daemon-reload Then start Artifactory container with systemd. sudo systemctl start artifactory Enable it to start at system boot. sudo systemctl enable artifactory Status can be checked with: sudo systemctl status artifactory Sample output: Also check service binding with: $ ss -tunelp | grep 8081 tcp LISTEN 0 128 *:8081 *:* users:(("docker-proxy",pid=2820,fd=4)) ino:117162 sk:b v6only:0 Step 6: Access Artifactory Web Interface Artifactory can be accessed using the following URL: http://SERVERIP_OR_DOMAIN:8081/artifactory You should see Artifactory welcome page. Follow setup instructions that follows. Once you complete JFrog Artifactory on Ubuntu 18.04, you should get to Administration dashboard. Step 7: Configure Nginx reverse proxy (Optional) If you want to use Nginx as Proxy with SSL, check out the guide below: Configure JFrog Artifactory behind Nginx reverse proxy and Let’s Encrypt SSL Conclusion JFrog Artifactory is a Universal Repository Manager supporting all major packaging formats, build tools and CI servers. Visit the Artifactory Documentation for more features and usage guides.
0 notes
Text
Here Is How To Create A Clean, Resilient Electrical Grid (Forbes)
Here Is How To Create A Clean, Resilient Electrical Grid (Forbes)
Erik Kobayashi-Solomon writes at Forbes: One leading thinker in the Grid Evolution space, Dr. Shuli Goodman, believes that the success of Linux to transform the tech world can and should be applied to next-generation electrical grids. Dr. Shuli Goodman, Executive Director of LF Energy DR. SHULI GOODMAN Dr. Goodman is the executive director of LF Energy, a young offshoot of the Linux Foundation…

View On WordPress
#linux academy aws#linux add user to group sudo#linux kernel github#linux unzip bz2#linux unzip file
0 notes
Text
Layouteditor user group

Layouteditor user group upgrade#
Layouteditor user group verification#
Layouteditor user group password#
Linux Execute Scheduled Tasks In A Loop (crontab Command).
Linux Execute Tasks Regularly (at Command).
Linux Run Background Commands Away From The Terminal (nohup Command).
Linux Resume Suspended Work in Background (bg Command).
Linux Restore Background Commands To Foreground (fg Command).
Linux Display The Jobs That Current Terminal Puts Into The Background (jobs Command).
Linux Kick User By Terminal Number (pkill Command).
Linux Kill A Specific Group Of Processes (killall Command).
Linux Change Process Priority (nice And renice Command).
Linux List Information About Files Called Or Opened By A Process (lsof Command).
Linux Display Process Tree (pstree Command).
Linux Continuously Monitor Process Running Status (top Command).
Linux Display Running Processes (ps Command).
Linux Query Disk Quota (quota And repquota Command).
Linux Set Disk Quota Non-interactively (setquota Command).
Linux Modify User (Group) Disk Quota (edquota Command).
Linux Turn Off Disk Quota Limits (quotaoff Command).
Linux Turn On Disk Quota Limit (quotaon Command).
Linux Scan FileSystem And Create A Quota File (quotacheck Command).
Linux Virtual Memory And Physical Memory.
Linux Format Hard Disk (mke2fs Command).
Linux Partition Large Capacity Hard Disk (parted Command).
Linux Partition Hard Disk (fdisk Command).
Linux Display FileSystem Information (dumpe2fs Command).
Linux Detect And Repair Filesystems (fsck Command).
Linux Unmount Filesystem (umount Command).
Linux Mount Files Outside The Linux System (mount Command).
Linux Count The Disk Space Occupied By A Directory Or File (du Command).
Linux Display File System Hard Disk Usage (df Command).
Linux System Permission Management (sudo Command).
Linux Display File And Directory Permission Attributes (lsattr Command).
Linux Modify File And Directory Permission Attributes (chattr Command).
Linux Stick BIT (SBIT) Special Permission.
Linux Create/Modify File And Directory Default Permissions (umask Command).
Linux Modify The File Or Directory Permissions (chmod Command).
Linux Modify The Owner And Group Of File And Directory (chown Command).
Linux Modify The Group Of File And Directory (chgrp Command).
The Importance Of Linux Permission Management.
Linux Switch The Effective Group Of Users (newgrp Command).
Linux Add User To Or Remove User From Group (gpasswd Command).
Linux Delete User Group (groupdel Command).
Linux Modify User Group (groupmod Command).
Linux Add User Group (groupadd Command).
Linux Switch Between Users (su Command).
Linux View User's UID And GID (id Command).
Layouteditor user group password#
Linux Modify User Password Status (chage Command).
Linux Modify User Information (usermod Command).
Linux Change User Password (passwd Command).
Linux Adding A New System User (useradd Command).
Linux Source Package Installation And Uninstallation.
Linux Extract RPM Package File (cpio Command).
Layouteditor user group verification#
Linux RPM Package Verification And Digital Certificates.
Layouteditor user group upgrade#
Linux RPM Package Installation, Uninstallation And Upgrade (rpm Command).Linux Find File Contents (grep Command).Linux Display The Ending Content Of File (tail Command).Linux Display File Content (less Command).Linux Display The Beginning Content Of File (head Command).Linux Display File Content by Paging (more Command).Linux Vim Batch Comments And Custom Comment.Linux Unzip ".bz2" File (bunzip2 Command).Linux Compress A File Or Directory to ".bz2" (bzip2 Command).Linux Unzip ".gz" File (gunzip Command).Linux Compress A File Or Directory to ".gz" (gzip Command).Linux Unzip ".zip" File (unzip Command).Linux Compress A File Or Directory to ".zip" (zip Command).Linux Move File Or Directory (mv Command).Linux Delete A File Or Directory (rm Command).Linux Copy File And Directory (cp Command).Linux Create Hard/Soft Links To File (ln Command).Linux Create File And Modify File Timestamp (touch Command).Linux Remove Empty Directory (rmdir Command).Linux Create A Directory (mkdir Command).linux View Files In A Directory (ls Command).
1 note
·
View note